Old wallpaper can make a room feel dated, heavy, or just plain neglected. Whether it’s peeling at the corners, faded from sunlight, or simply no longer your style, removing it is often the first step in refreshing a space. The challenge, however, is doing it without damaging the wall underneath. Many people worry about tearing drywall paper, leaving glue residue, or creating uneven patches that are harder to fix than the wallpaper itself.
The good news is that wallpaper removal doesn’t have to be risky or complicated. With the right method, tools, and patience, you can strip old wallpaper cleanly and reveal a smooth surface underneath that is ready for painting or redecorating.
Understanding Why Wallpaper Is Hard to Remove
Before jumping into removal, it helps to understand why wallpaper sticks so strongly in the first place. Most wallpapers are installed using adhesive glue that is designed to last for years. Over time, this glue bonds tightly with paint or drywall, especially in humid environments.
There are also different types of wallpaper:
- Strippable wallpaper that peels off easily in sheets
- Vinyl-coated wallpaper that resists moisture
- Traditional paper wallpaper with strong adhesive backing
- Painted-over wallpaper that becomes even harder to remove
Each type reacts differently to removal methods. The goal is to soften the adhesive without damaging the wall surface underneath.
Preparing the Room Before Removal
Proper preparation makes the entire process smoother and safer. Start by clearing the room as much as possible. Move furniture away from the walls or cover it with protective sheets. Wallpaper removal can get messy, especially when water or steam is involved.
It’s also important to protect your flooring. Lay down plastic sheets, old newspapers, or drop cloths to catch falling wallpaper strips and adhesive residue.
Before starting, switch off power in the room and remove switch plates or outlet covers. This prevents water from reaching electrical areas and gives you a cleaner working surface.
Step One: Test the Wallpaper Type
Not all wallpaper requires the same removal approach, so testing a small corner is essential. Try peeling a section from the bottom or edge.
If it comes off easily in large sheets, you are likely dealing with strippable wallpaper. If it tears or resists, it probably needs moisture or steam to loosen the adhesive.
To test moisture response, spray a small section with warm water and wait a few minutes. If the wallpaper softens or starts peeling, the wet method will work well.
Step Two: Start With Dry Peeling
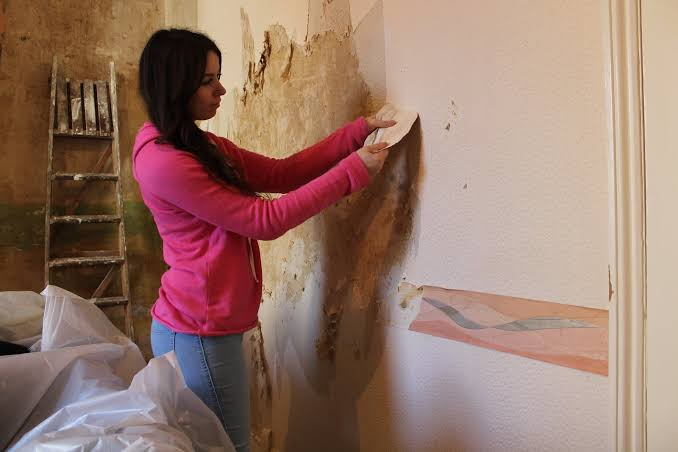
If the wallpaper is already loose or partially peeling, start with dry removal. Gently lift a corner using a putty knife and try pulling it down slowly at an angle.
The key here is patience. Pulling too quickly can tear the drywall paper underneath. Slow, steady pulling reduces the risk of damage.
In some cases, the top decorative layer comes off easily, leaving a thin backing layer behind. This is normal and expected for many modern wallpapers.
Step Three: Use Warm Water to Soften Adhesive
For wallpaper that doesn’t peel easily, warm water is one of the simplest and safest solutions. Fill a spray bottle or bucket with warm water and apply it generously to the wall surface.
Allow the water to soak into the wallpaper for 10 to 15 minutes. This softens the adhesive and makes removal easier.
You may need to repeat this process multiple times, especially for older wallpaper or thick vinyl layers. The goal is to let the water penetrate fully before attempting to peel again.
Step Four: Add a Wallpaper Removal Solution
For more stubborn wallpaper, a mild removal solution can help break down adhesive faster. You can use a store-bought wallpaper remover or a simple homemade mixture of warm water and a small amount of dish soap or vinegar.
Apply the solution using a sponge, spray bottle, or paint roller. Let it sit so it can loosen the glue. Once the wallpaper starts to bubble or soften, gently scrape it off using a plastic scraper or putty knife.
Avoid using metal tools aggressively, as they can easily gouge drywall or leave permanent marks.
Step Five: Steam Method for Stubborn Wallpaper
If water alone is not enough, a wallpaper steamer is one of the most effective tools. Steam penetrates deep into layers of wallpaper and loosens even strong adhesives.
Hold the steamer against the wall for a few seconds, then slowly peel or scrape the wallpaper while it is warm and soft. Work in small sections so the adhesive does not cool and harden again.
This method is especially useful for older homes or multiple wallpaper layers.
Step Six: Removing the Backing Layer
In many cases, even after removing the top layer, a thin paper or glue backing remains on the wall. This layer must also be removed before painting or re-wallpapering.
Spray it again with warm water and gently scrape it off. If it resists, let it soak longer. Rushing this step can lead to uneven wall surfaces later.
The wall should feel smooth and slightly damp but not damaged when this process is done correctly.
Step Seven: Clean Off Glue Residue
Once all wallpaper layers are removed, adhesive residue is often left behind. This sticky layer can interfere with painting or new wallpaper installation.
To clean it, use warm water mixed with a mild detergent and scrub gently with a sponge. For tougher glue spots, vinegar or specialized adhesive removers can be used.
It’s important to remove all residue completely because even small patches can cause paint to bubble or peel later.
Step Eight: Repair Any Wall Damage
After wallpaper removal, it’s common to find small imperfections such as dents, torn drywall paper, or uneven patches.
Use a lightweight wall filler or spackling compound to repair damaged areas. Once dry, sand the surface lightly until smooth.
If large sections of drywall paper were damaged during removal, a primer designed for drywall sealing should be applied before painting.
Step Nine: Prime the Wall Before Redecorating
Priming is often overlooked but extremely important. A primer seals the wall surface, evens out absorption, and prepares it for paint or new wallpaper.
Without primer, walls may absorb paint unevenly, leading to patchy or dull results.
Apply a smooth, even coat of primer and allow it to dry fully before moving on to finishing touches.
Step Ten: Prevent Future Wallpaper Problems
Once the wall is restored, it helps to take steps that make future removal easier. Using strippable wallpaper or peelable adhesive products can save a lot of effort later.
Good ventilation in rooms also helps prevent glue from bonding too aggressively over time, especially in humid areas like kitchens and bathrooms.
Common Mistakes to Avoid
Many people damage walls during wallpaper removal due to rushed or incorrect techniques. Some common mistakes include:
- Pulling wallpaper too aggressively without softening glue
- Skipping soaking or steaming steps
- Using sharp metal scrapers on drywall
- Not removing backing paper completely
- Painting over glue residue instead of cleaning it
Avoiding these mistakes ensures a smoother, safer removal process.
FAQs
What is the easiest way to remove old wallpaper?
The easiest method is soaking the wallpaper with warm water or a removal solution and gently peeling it off once the adhesive softens.
Can wallpaper be removed without damaging drywall?
Yes, if done carefully using water, steam, and proper tools, wallpaper can be removed without harming the wall underneath.
Do I need a steamer to remove wallpaper?
Not always. A steamer is helpful for stubborn or old wallpaper, but many wallpapers can be removed using just warm water and scraping tools.
Why is my wallpaper tearing instead of peeling?
This usually happens when the adhesive is still too strong or not softened enough. More soaking time is needed before removal.
How do I remove glue left after wallpaper?
Use warm water mixed with mild detergent or vinegar and gently scrub the surface until all adhesive residue is gone.
Can I paint over wallpaper instead of removing it?
It is not recommended because wallpaper can bubble, peel, or create uneven paint texture over time.
How long does wallpaper removal take?
It depends on the type and number of layers, but most rooms take a few hours to a full day for complete removal.
Final Thoughts
Removing old wallpaper without damaging the wall underneath is completely achievable when the right method is followed. The key is patience, proper soaking, and careful scraping rather than forceful peeling.
By working in stages—softening the adhesive, removing layers slowly, cleaning residue, and repairing minor damage—you can restore your walls to a clean, smooth surface ready for a fresh look.
While it may take time, the result is worth it: a clean foundation that allows you to repaint or redecorate with confidence, without hidden damage or future problems.